Managing ads on platforms like Google Ads and Meta Ads can be challenging due to their different metrics and dashboards. Custom metrics solve this issue by allowing you to create formulas tailored to your business goals, such as calculating profitability or tracking high-quality leads. These metrics unify data across platforms, reduce manual errors, and improve campaign performance by focusing on your priorities. Here's a quick breakdown:
- What are custom metrics? Formulas combining existing data fields (e.g., Cost Per Qualified Lead or Profitability).
- Why use them? They simplify cross-platform reporting, save time by automating calculations, and enhance decision-making.
- How to create them? Both Google Ads and Meta Ads offer cross-platform tracking tools to define metrics using basic math operations (+, -, *, /) and filters.
Custom metrics aren't just for tracking - they help optimize campaigns by aligning metrics with your goals. Follow platform-specific steps to create, save, and apply them effectively.
Unlock Facebook Ads Success: Custom Metrics Deep Dive 📈
sbb-itb-89b8f36
Prerequisites for Creating Custom Metrics
Before diving into custom metrics, make sure you have the right permissions, enough data to work with, and a basic understanding of formulas. These steps are essential for creating and applying custom metrics effectively. Once you're ready, take a closer look at the specific requirements for each platform.
Account Access and Permissions
The ability to create custom metrics depends heavily on your permission level. Here's a breakdown for different platforms:
- Google Ads: Standard account access is enough to create custom columns. If you're managing multiple accounts through a Manager account (MCC), you can create and manage custom columns across all linked accounts from the Performance page.
- Meta Ads Manager: You’ll need access to the specific ad account. Metrics can be kept private ("Only you") or shared with "Everyone with access to this ad account." Once shared, others can view the metric but won’t be able to edit its formula, name, or description.
- Google Analytics 4 (GA4): An "Editor" or "Administrator" role at the property level is required. You can check your role in the Admin settings. Without this level of access, you won’t be able to use the "Custom definitions" feature.
Data Volume and Metric Reliability
A solid data foundation is crucial for custom metrics to work well. Campaigns with limited traffic or new campaigns might not produce reliable calculations. For instance, in GA4, you should wait 24 to 48 hours after sending a custom event parameter before the metric appears correctly in detailed reports.
"Overcomplicating custom metrics can lead to confusion and errors in data interpretation." – Nat Taylor, Alley Group
Start with simple formulas. A basic calculation like Cost / Conversions for Cost Per Conversion is a good starting point. As your campaigns grow and data volume increases, you can make more complex calculations. Be cautious when changing the data source - switching from Revenue to Gross Profit, for example, makes it impossible to compare historical data, as the underlying values differ.
After confirming permissions, ensure your data volume is sufficient to support reliable custom metrics.
Formula Syntax and Operators
All platforms support basic arithmetic operators: addition (+), subtraction (-), multiplication (*), and division (/). These follow the standard order of operations: parentheses first, then multiplication and division, followed by addition and subtraction.
Here are some platform-specific details:
- Meta Ads Manager: Formulas must include at least two metrics and one symbol to be valid. Avoid dividing by zero, placing two symbols back-to-back, or using parentheses directly after a number.
- Google Ads: Use "text mode" to write formulas. Standard metrics can be typed directly, but references to other custom columns require the
c:prefix wrapped in double quotes, likec:"Mobile Clicks" * 2. Use a period for decimals (e.g., 5.5) and avoid thousand separators (e.g., write 3020) to prevent errors.
Google Ads also supports comparison operators like less than (<), greater than (>), equal to (=), and not equal to (!=). These can return True/False values, making them useful for conditional metrics. Meta Ads Manager, however, doesn’t support these advanced operators, so stick to straightforward calculations.
Creating Custom Metrics in Google Ads

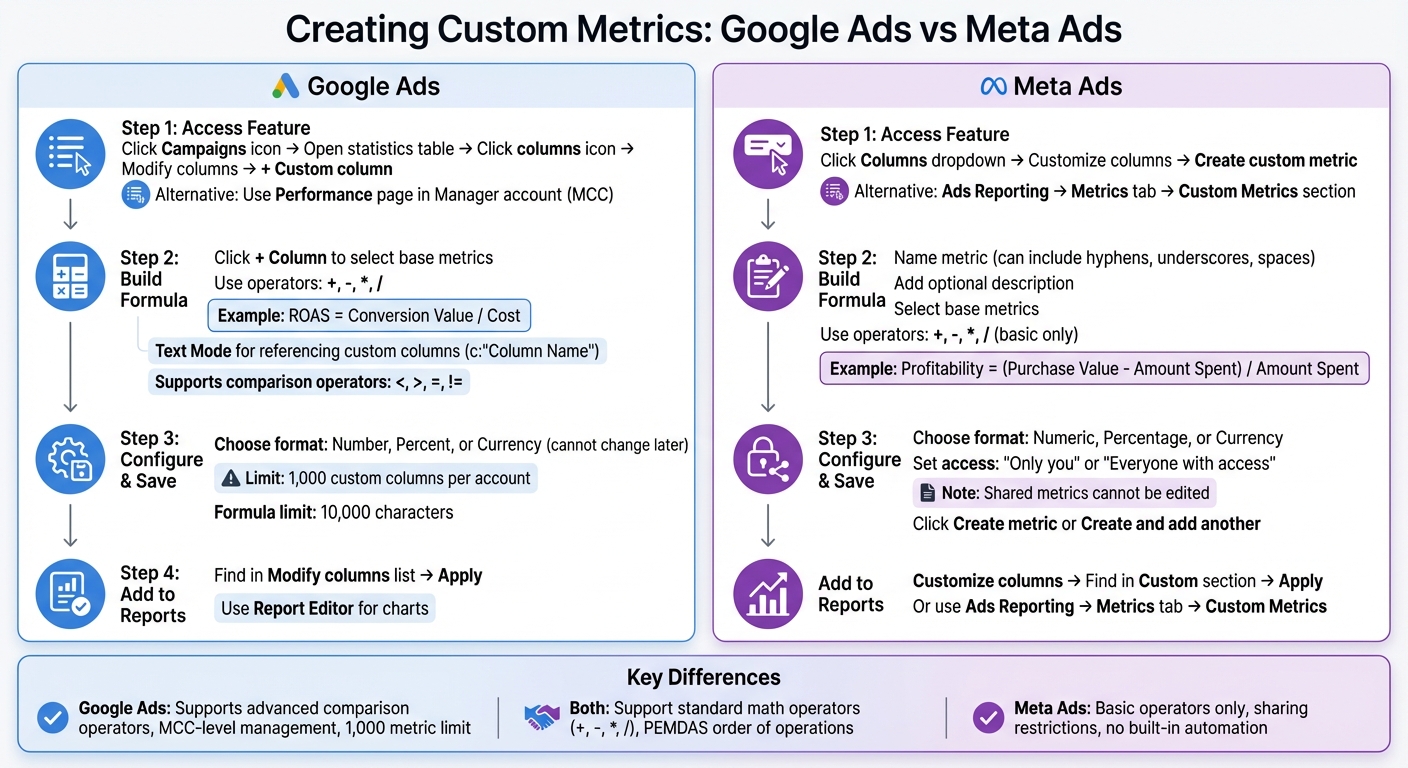
Google Ads vs Meta Ads Custom Metrics Setup Comparison
These steps for Google Ads align closely with processes in Meta Ads, making it easier to create unified cross-platform reports.
Finding the Custom Columns Feature
Start by signing in to your account. Click the Campaigns icon and open any statistics table, such as Campaigns, Ad groups, or Ads. In the table's upper-right corner, click the columns icon, choose Modify columns from the dropdown, and then select + Custom column to create your metric.
If you're managing several accounts through a Manager account (MCC), or working with top PPC agencies you can create custom columns directly from the Performance page. This lets you track metrics across all linked accounts in one place.
Building and Saving Custom Metrics
Click + Column to choose base metrics like Clicks, Impressions, or Cost. Use operators like addition (+), subtraction (-), multiplication (*), and division (/) to build formulas. For example, to calculate ROAS, use the formula Conversion Value / Cost.
Filters can help you focus on specific data. For instance, to track mobile clicks, select "Clicks" and filter by "Device", choosing "Mobile phones". If you want to reference previously created custom columns, use Text Mode along with the appropriate referencing format.
Before saving, decide on a data format - Number, Percent, or Currency. Be sure about your choice because it cannot be changed later. Each account can support up to 1,000 custom columns, and formulas can include up to 10,000 characters.
Once saved, you can use your custom metric in reports for a more detailed analysis.
Adding Custom Metrics to Reports
After saving your metric, it will appear in the "Modify columns" list. Select it and click Apply to add it to your active statistics table. To dive deeper, use the Report Editor, where you can drag and drop your custom metrics into the "Columns" or "Y-Axis" sections of charts and tables.
If you see a dash (-) instead of a value, check that all dependent metrics have data and ensure no conflicting filters are applied. Keep in mind that summary rows in custom columns calculate horizontally across totals, rather than summing values vertically.
Creating Custom Metrics in Meta Ads
Meta Ads Manager offers a process similar to Google Ads for creating custom metrics, making it easier to maintain consistency across platforms.
Finding the Customize Columns Section
To get started, open Meta Ads Manager and click the Columns dropdown at the top of your campaign table. From there, select Customize columns. In the window that opens, look for the Create custom metric link. Alternatively, you can go through Meta Ads Reporting by navigating to the Metrics tab and scrolling down to the Custom Metrics section.
Once there, you’ll use the formula builder to create and modify your custom metric.
Building and Saving Custom Metrics
Click Create custom metric and give your metric a name. You can include hyphens, underscores, and spaces in the name. If needed, add a brief description to clarify its purpose.
Next, select the base metrics you want to use and combine them with operators like +, -, *, or /. For instance:
- To calculate profitability: (Purchase Value - Amount Spent) / Amount Spent
- To measure link click-to-purchase rate: (Purchases / Link Clicks)
Choose the appropriate format for your metric:
- Numeric for raw counts
- Percentage for rates
- Currency for financial values
Decide who will have access to the metric. You can keep it private by selecting "Only you", or share it with others who have access to the ad account by choosing "Everyone with access to this ad account". Keep in mind, shared metrics cannot be edited later.
Before saving, double-check your formula for errors. Meta uses standard mathematical rules, so mistakes like placing two symbols together or dividing by zero will cause issues. Also, make sure custom event names don’t have spaces, as this can lead to formula errors.
When everything looks good, click Create metric to save it. If you need to create additional metrics, you can use the Create and add another option.
Once your metric is ready, you can add it to your campaign reports.
Adding Custom Metrics to Campaign Reports
To include your custom metric in reports, go back to Customize columns, find your metric under the Custom section, and click Apply. Alternatively, if you’re using the standalone Ads Reporting tool, go to the Metrics tab and scroll down to the Custom Metrics section to add it.
Best Practices for Custom Metrics
Weekly and Monthly Metric Reviews
To stay on top of your custom metrics, review them weekly to catch errors early. These might include formula issues or problems with the order of operations (remember PEMDAS: parentheses, exponents, multiplication, division, addition, subtraction). If you notice anomalies, double-check whether platform updates or changes in base metrics have impacted your formulas.
Monthly reviews are equally important for ensuring your metrics align with your business goals. This is the time to remove outdated metrics and adjust formulas as your strategies evolve. For example, if your focus shifts from awareness campaigns to conversion-driven strategies, you might replace a metric like Thumbstop Rate with one that tracks conversion performance more effectively, such as Cart Drop-off Rate. Tools like Supermetrics, used by over 500,000 marketers, can automate data collection from more than 60 platforms, reducing the risk of manual errors during these reviews.
To make the process even smoother, consider integrating automation rules wherever possible.
Setting Up Automation Rules with Custom Metrics
Automation rules can save time and improve efficiency. For instance, in Google Ads, you can set rules to pause underperforming ad groups or adjust budgets when a specific return metric hits its target. These rules help you react quickly to changes in campaign performance.
Meta Ads Manager, however, doesn’t offer built-in automation for custom metrics. In this case, third-party tools can be a game-changer, allowing you to monitor metrics like Conversion Rate or Click Quality more effectively. As Jon Quinton, Founder of Overdrive Digital, explains:
"The less time we can spend collecting information and data the better because then it frees up more time we can spend looking at it and making decisions from it".
Using external tools to centralize your data can further enhance your ability to act on insights.
Using External Tools for Cross-Platform Tracking
For the most accurate and actionable insights, centralize your data on a unified platform. Exporting data to consolidated tools allows you to analyze metrics across channels without the hassle of manual calculations. Resources like the Top PPC Marketing Directory (https://ppcmarketinghub.com) can help you find tools that pull data from multiple sources into a single dashboard, creating a reliable, centralized view of your performance.
Consistency is key when working with custom metrics across platforms. If you calculate a profitability metric using a specific formula in Google Ads, apply the same formula in Meta Ads. This approach ensures reliable benchmarking and makes it easier to compare platform performance. Additionally, automate daily data refreshes to keep your metrics up-to-date, so you can make informed budget adjustments based on the latest performance data.
Conclusion
Custom metrics offer precise control over your PPC campaigns by letting you monitor the performance indicators that matter most to your business. Whether you're calculating Return on Ad Spend (ROAS), Cost Per Qualified Lead, or measuring profitability across different channels, these formulas transform raw data into actionable insights, going beyond standard KPIs. This approach simplifies cross-platform reporting for both Google Ads and Meta Ads.
The setup process on both platforms is straightforward: assign a unique name, include an optional description, and choose the appropriate data format - Numeric, Percentage, or Currency.
To get the most out of custom metrics, keep your formulas focused on your core business objectives. Regularly reviewing and automating these metrics ensures they stay relevant over time. As Nat Taylor, Marketing Specialist at Alley, explains:
"Custom metrics are user-defined formulas that combine existing data fields within Google Ads, making them essential for accurately tracking your campaign performance."
Use these insights to fine-tune your advertising strategies. For additional PPC tools, expert guidance, and resources to improve your campaigns, visit the Top PPC Marketing Directory at https://ppcmarketinghub.com. You'll discover tailored solutions for campaign management, performance tracking, and optimizing your paid marketing efforts.
FAQs
Which custom metrics should I create first?
To get the most out of your PPC campaigns, begin by setting up custom metrics that directly reflect your main campaign goals. For instance, you might track metrics like conversion rate, return on ad spend (ROAS), or cost per acquisition (CPA). These go beyond the standard options, offering deeper insights into what's working and what isn't. By zeroing in on metrics that align with your objectives, you’ll be better equipped to measure performance and make informed adjustments for improved results.
How do I prevent divide-by-zero errors in formulas?
To prevent divide-by-zero errors, it's essential to check the denominator before performing any division. Here's how you can handle this issue in different tools and programming languages:
- Excel: Use the
IFfunction to check if the divisor is zero or blank and handle it accordingly. Alternatively, theIFERRORfunction can replace any errors, including division by zero, with a specific value. - SQL: The
NULLIFfunction is a handy way to avoid divide-by-zero errors. It returnsNULLif the divisor equals zero, effectively bypassing the error. - Python: You can either validate the divisor before dividing or use a
try-exceptblock to catch and handle the error gracefully.
Each method ensures your calculations remain error-free and your code or formulas work as intended.
How can I keep custom metrics consistent across Google Ads and Meta Ads?
To keep things consistent, make sure to define and calculate custom metrics in the exact same way across both platforms. Use matching formulas and parameters - like having the same numerator and denominator for conversion rates. It’s a good idea to review these metrics regularly to ensure everything stays aligned. Tools that automate reporting can make this process easier by centralizing your data, allowing you to standardize and compare metrics more efficiently.