The Facebook Conversions API (CAPI) is a server-side solution that helps businesses send conversion data directly from their servers to Meta, bypassing browser limitations like ad blockers, privacy restrictions, and tracking prevention. By combining CAPI with the traditional Meta Pixel, you can recover lost data, improve ad performance, and ensure more accurate campaign tracking.
Key Takeaways:
- Why Use CAPI? Browser-based tracking can miss up to 50% of conversions due to privacy updates (e.g., iOS 14+). CAPI ensures data reliability by sending events directly from your server.
- How It Works: CAPI tracks server-side events (like purchases) while the Pixel captures browser-based actions (like page views). Meta deduplicates events to avoid double counting.
- Setup Requirements: You’ll need a Meta Pixel ID, API access token, and a server environment (e.g., Google Tag Manager Server-Side or AWS).
- Benefits: Reduced data loss, better ad attribution, and the ability to track offline or CRM-based events.
Quick Steps to Set Up:
- Create a Meta Pixel: Set up in Events Manager and enable dual tracking (Pixel + CAPI).
- Generate an Access Token: Authenticate server requests to Meta via Events Manager or Business Manager.
- Choose an Integration Method: Use top PPC tools like Google Tag Manager Server-Side or a custom API setup.
- Test and Verify: Use the Test Events tool to confirm data flow and optimize your Event Match Quality (EMQ) score.
By implementing CAPI, you can close tracking gaps, reduce costs, and improve campaign results by leveraging more accurate and privacy-compliant data. Start by setting up your Meta Pixel, generating your access token, and testing your first server-side event.
Install Facebook (Meta Ads) Conversion API with server-side GTM
sbb-itb-89b8f36
Prerequisites for Facebook Conversions API Setup
To successfully implement the Facebook Conversions API, you need to gather specific Meta assets and prepare your server environment. Overlooking any of these essentials can stop the setup process in its tracks.
Required Meta Assets
First, you'll need a Business Manager account. This tool is essential for managing all your Meta marketing assets using top PPC marketing tools. Within Business Manager, an active Meta Pixel ID is mandatory. If you're already using a browser pixel, Meta suggests sticking with the same Pixel ID for your server events. This ensures consistent data flow and simplifies deduplication.
Another key item is an API access token, which is used to authenticate every server request sent to Meta. You can generate this token in two primary ways:
- Via Events Manager: Go to your Pixel's Settings tab, and under the Conversions API section, click "Generate access token." Note that this option is only visible if you have developer privileges on your Business Manager account.
- Via Business Manager: Set up a System User, which is a non-human account that "owns" the token. Assign it "Manage Pixel" permissions to complete the process.
If you're implementing the API directly, you likely won’t need a Meta App. However, for platform-level integrations or if you're generating tokens through Business Manager, a Meta App becomes necessary. In such cases, platform providers serving multiple clients must also complete App Review and obtain Advanced Access, along with permissions like ads_management, pages_read_engagement, and ads_read.
Once you've gathered these assets, the next step is configuring your server environment.
Server Environment and Tools
With the Meta assets ready, you'll need a server environment to handle and forward event data to Meta. Common options include:
- Google Tag Manager Server-Side (sGTM), which operates on Google Cloud Platform (GCP).
- Conversions API Gateway, which can be deployed using AWS App Runner.
- Hosting your own solution on platforms like AWS or Microsoft Azure.
If you choose GTM, you'll need a Web Container, a Server Container, and GA4 as the client to send data to your server. For direct integrations, Meta offers Business SDKs in various programming languages, including PHP (7.2+), Node.js (7.6.0+), Java (8+), Python (2.7+), and Ruby (2+). These SDKs simplify the process by handling SHA-256 hashing and managing asynchronous requests, saving you from building everything from scratch.
Additionally, basic familiarity with REST APIs, JSON formatting, and Unix timestamps will be necessary to structure your event payloads correctly.
How to Set Up Facebook Conversions API
Once your Meta assets and server environment are good to go, you can implement the Conversions API using either sGTM (Google Tag Manager Server-Side) or a custom integration. Both methods require a Meta Pixel, an API access token, and confirmation of data flow. Let’s dive into the steps, starting with activating your Meta Pixel.
Step 1: Create and Configure a Meta Pixel
To activate your Meta Pixel, head to Events Manager and select 'Connect Data Sources' → 'Web.' Assign a name to your pixel, click 'Create Pixel,' and choose the 'Do it yourself' option with 'Conversions API and Meta Pixel' to enable dual tracking.
After creating the pixel, go to the Settings tab and enable Automated Advanced Matching. This feature helps capture hashed customer data directly from form fields, which can boost your Event Match Quality scores using expert-recommended PPC strategies. Don’t forget to verify your domain by navigating to Business Settings > Brand Safety > Domains. Businesses using the Conversions API alongside the Meta Pixel have reported an average of 13% lower cost per result and 19% more attributed purchase events.
Step 2: Generate an API Access Token
The API access token is essential for authenticating server requests to Meta. In Events Manager, open the Settings tab for your pixel, locate the Conversions API section, and click "Generate Access Token" under the "Set up manually" option. Note: this feature is available only to users with developer privileges for the business.
Once the token is generated, clicking "Manage Integrations" will automatically create a Conversions API app and system user, bypassing the need for a manual App Review. Be sure to store the token securely for future use.
Step 3: Implement Server-Side Tracking with sGTM
If you’re using Google Tag Manager Server-Side (sGTM), follow these steps:
- Create a GA4 Configuration tag in your web container. Set the
transport_urlto your tagging server’s URL and enable first-party data collection. - Activate a GA4 Client in your server container.
- Install the "Conversions API Tag" from the Template Gallery.
- Map GA4 event parameters to Meta’s schema. For example, link
user_data.email_addressto Meta’s email parameter andx-fb-ck-fbpto the browser ID.
Deduplication is crucial here. Generate a unique event_id in your web container and pass it to both the Meta Pixel and GA4 events. This ensures Meta can recognize duplicate events if the same event_id and event_name are received from both sources within a 48-hour window.
Step 4: Manual Server-Side Integration
For custom setups, you’ll need to create a JSON payload containing the required fields, such as event_name, event_time (in Unix format), user_data, and action_source. Send this payload via a POST request to:
https://graph.facebook.com/{API_VERSION}/{PIXEL_ID}/events
Each batch request can include up to 1,000 events. Keep in mind that:
- Events with an
event_timeolder than 7 days will be rejected. - Delays of more than 2 hours in sending events can negatively impact ad optimization.
Step 5: Test and Verify Integration
To ensure everything is set up correctly, use the Test Events tool in Events Manager. Generate a test_event_code and include it in your sGTM tag or manual payload. This allows you to view real-time activity without affecting live data. A successful connection is confirmed by a 200 response.
After testing, check your Event Match Quality (EMQ) score in Events Manager. Aim for a score of 6.0 or higher, with purchase events ideally scoring between 8.8 and 9.3. Higher scores indicate better matching of events to Meta user accounts, which can enhance ad attribution. Lastly, monitor the deduplication process to confirm that both browser and server events are recognized as the same conversion.
Benefits of Facebook Conversions API for PPC Campaigns
Meta Pixel vs Facebook Conversions API Comparison
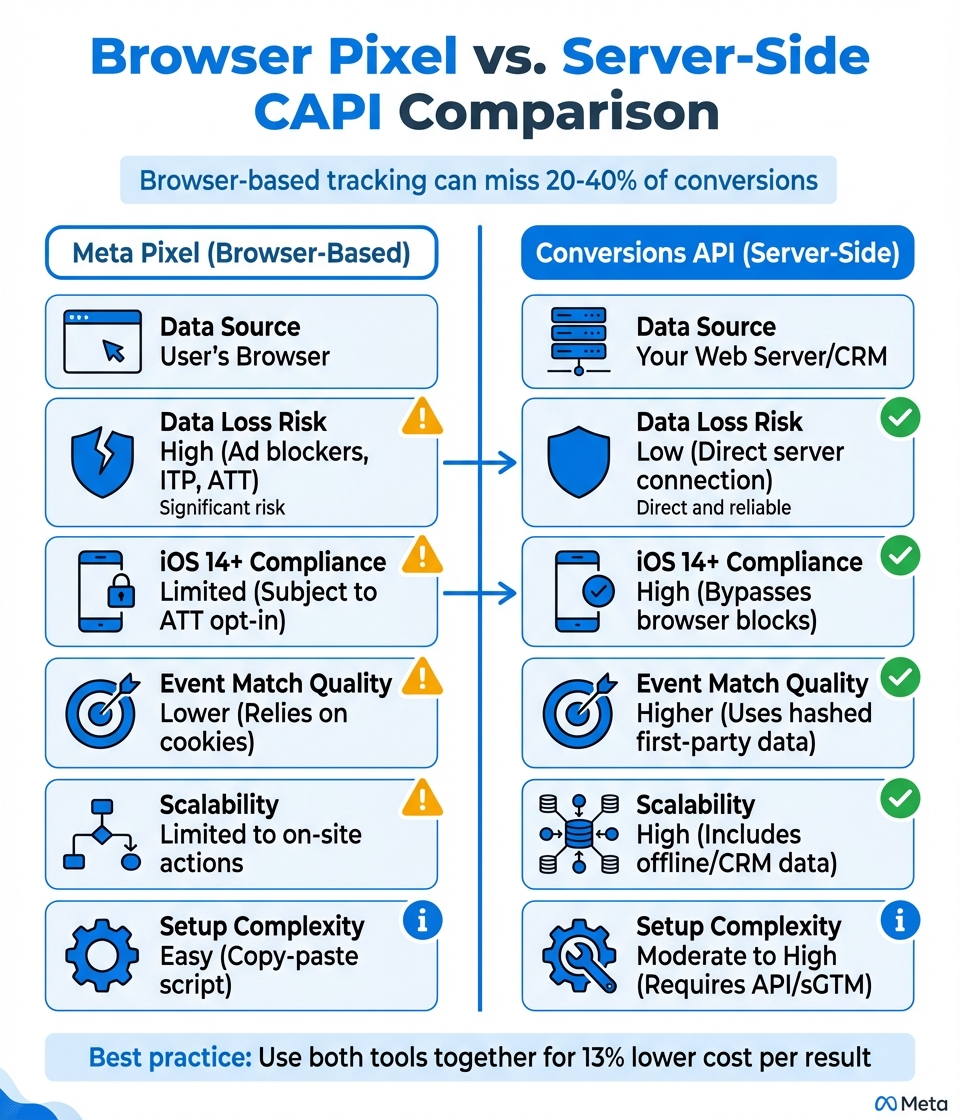
Once you've set up the Conversions API (CAPI), its impact on your campaigns goes beyond just better data tracking - it directly enhances performance. One of the standout perks of CAPI is its ability to recover lost conversion data and boost Meta's algorithmic accuracy. Why does this matter? Browser-based tracking can miss a staggering 20%–40% of conversions because of ad blockers and privacy tools. By pairing CAPI with your Meta Pixel, these gaps shrink significantly. This combination not only improves tracking but also helps you achieve better financial outcomes.
For instance, using both tools together can cut your cost per result by about 13%. How? CAPI relies on persistent server-side identifiers, like hashed emails or phone numbers, to refine attribution and optimization.
CAPI also goes beyond the Pixel's capabilities by tracking offline conversions, CRM milestones, and post-session actions. This expanded view allows you to focus on high-value customers by incorporating business-specific data, such as lifetime value or profit margins, into your strategies.
"The Pixel tells you who showed interest; CAPI confirms who actually converted." - Simul S., Founder and Marketer
Real-world examples highlight the power of CAPI. Take MNMLST's 2025 campaign: by using an advanced CAPI setup to segment conversion events by average order value (AOV) and gender, they saw a 117% revenue boost and improved their Event Match Quality (EMQ) score.
Browser Pixel vs. Server-Side CAPI Comparison
Here's a quick breakdown of how browser-based tracking and server-side CAPI stack up:
| Feature | Meta Pixel | Conversions API |
|---|---|---|
| Data Source | User's Browser | Your Web Server/CRM |
| Data Loss Risk | High (Ad blockers, ITP, ATT) | Low (Direct server connection) |
| iOS 14+ Compliance | Limited (Subject to ATT opt-in) | High (Bypasses browser blocks) |
| Event Match Quality | Lower (Relies on cookies) | Higher (Uses hashed first-party data) |
| Scalability | Limited to on-site actions | High (Includes offline/CRM data) |
| Setup Complexity | Easy (Copy-paste script) | Moderate to High (Requires API/sGTM) |
This table underscores the strengths of CAPI, especially in areas like data reliability, compliance with privacy updates, and scalability. While the Pixel is easy to set up, CAPI offers a deeper, more accurate understanding of your campaign performance.
Conclusion
The Facebook Conversions API offers a game-changing way to capture and use conversion data. By shifting tracking from browsers to your server, you can recover the 20%–40% of conversions that browser-based pixels often miss. This means better campaign performance, reduced costs, and more precise attribution for your PPC efforts. Plus, it helps you navigate browser limitations while meeting modern privacy expectations.
Setting it up successfully depends on three key steps: selecting the right integration method (whether that's the CAPI Gateway, Server-Side GTM, or manual API), ensuring event deduplication with matching event_id values, and improving Event Match Quality by sending hashed customer identifiers like emails and phone numbers. Focusing on these areas can help you achieve EMQ scores of 8.0 or higher for improved optimization.
Using the Conversions API alongside your Meta Pixel ensures solid tracking. By following the outlined steps, you can maintain consistent and accurate data collection.
Whether you choose a CAPI Gateway or a custom integration, the benefits of improved data accuracy and stronger campaign performance make this approach worth it. Server-side tracking is quickly becoming a must-have for staying competitive in paid advertising.
Get started by verifying your domain, generating your access token, and testing your first server-side event. From there, you can expand to include offline conversions, CRM data, and advanced segmentation strategies that give your PPC campaigns a real advantage.
For more expert tips on boosting your PPC campaigns, check out the Top PPC Marketing Directory (https://ppcmarketinghub.com).
FAQs
Do I need both the Meta Pixel and Conversions API?
Yes, it's a good idea to use both the Meta Pixel and the Conversions API together. Meta suggests this combination because the Conversions API can bypass browser limitations and ad blockers, ensuring more reliable tracking. By using both tools, you can gather more accurate data and gain deeper insights into your campaign performance.
How do I prevent double-counting with event deduplication?
To avoid double-counting conversions when using Facebook's Conversions API, make sure that both the browser Pixel and server-side CAPI events share the same event_id. This unique identifier allows Meta to match and deduplicate events, ensuring they’re treated as a single conversion.
Here’s how you can do it:
- Generate a unique event_id for every conversion.
- Use the same event_id consistently in both Pixel and CAPI calls.
- Ensure that event names and IDs are aligned to maintain accurate attribution.
By following these steps, you can streamline your data and avoid discrepancies in reporting.
What data should I send to improve Event Match Quality (EMQ)?
To boost Event Match Quality (EMQ), make sure to include key user identifiers when sending server events. Prioritize details like email addresses, as well as the _fbp and _fbc cookies, since these play a major role in improving EMQ. Better matching leads to more accurate attribution, reduced CPAs, and higher reported conversions. Relying solely on client-side pixels won't cut it - leveraging server-side tracking through the Facebook Conversions API is essential for achieving strong EMQ scores.