Google Ads Lead Form Extensions (now called lead form assets) let you collect user information directly within your ad without needing a separate landing page. This streamlined approach improves lead generation by reducing drop-offs. Here's what you need to know:
- Who Can Use It: Available for Search, Display, Performance Max, and Video campaigns. Accounts must meet specific spending and verification requirements.
- How It Works: Users can fill out forms directly in the ad. If signed into Google, their information auto-fills for faster submissions.
- Setup Requirements: Includes a valid privacy policy URL, compliant ad formats, and conversion-focused bidding strategies.
- Lead Management: Leads can be downloaded as CSV files (30-day limit) or integrated with CRMs using webhooks for real-time delivery.
Want to set up lead forms? Follow these steps:
- Access the lead form editor in the campaign's Assets section.
- Create a form with a headline, description, and required fields (e.g., Name, Email).
- Add qualifying questions, customize CTAs, and provide your privacy policy URL.
- Automate lead delivery using webhooks or tools like Zapier.
Pro Tip: Keep forms short to increase completion rates, and test different CTAs to find what works best.
Google Ads Lead Form Assets: Best Practices and How To Use Them Effectively
sbb-itb-89b8f36
Prerequisites for Setup
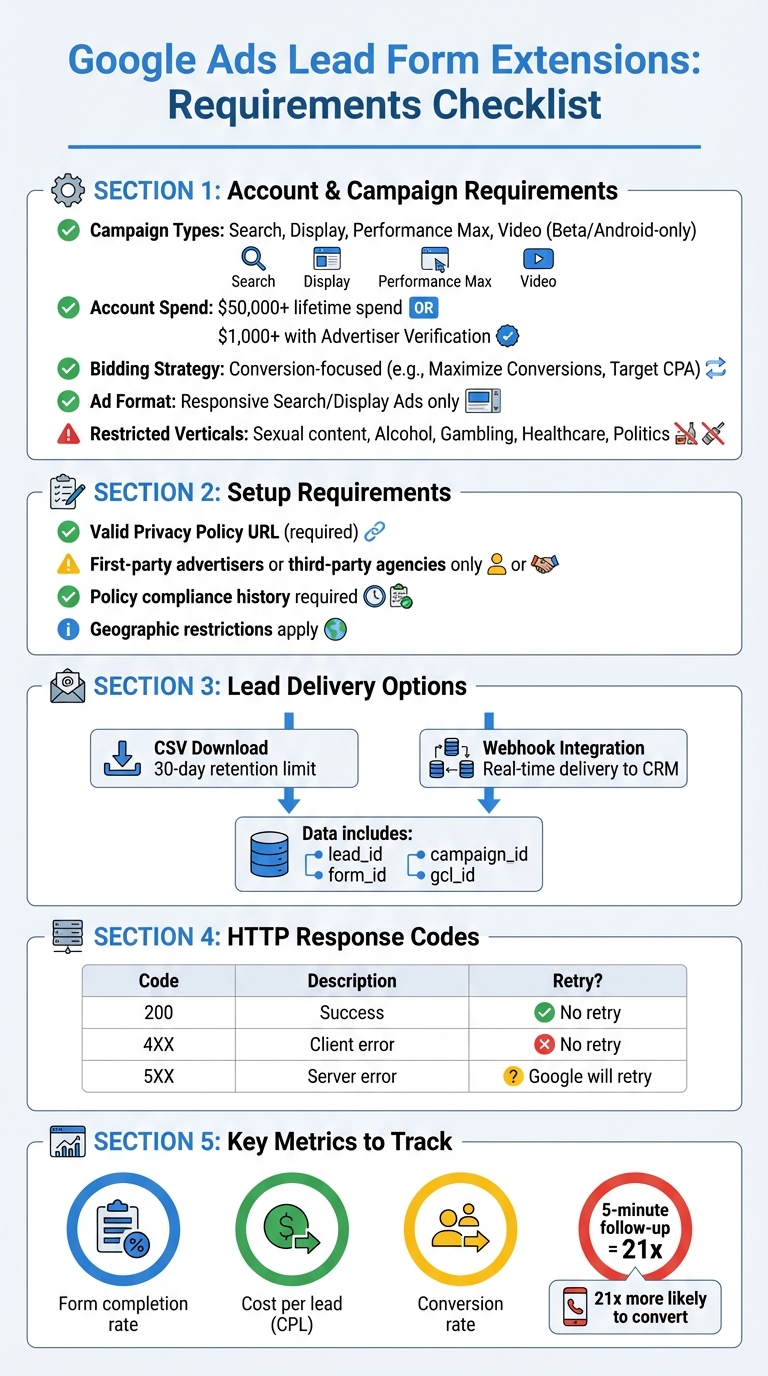
Google Ads Lead Form Extensions Requirements and Setup Checklist
Before you dive into creating a lead form asset, you’ll need to ensure your account and campaign meet Google’s requirements. These rules are in place to maintain advertiser credibility and ensure compliance with privacy standards.
Account and Campaign Type Requirements
Lead form assets can be used with Search, Display, Performance Max, and Video campaigns. However, there are specific conditions to meet:
- For Video, Display, or Search ads with headline-triggered forms, your account must have a lifetime spend of over $50,000 USD.
- Alternatively, accounts with a minimum spend of $1,000 USD (or $15,000 USD across all accounts) and verified through the Advertiser Verification program also qualify.
Your campaigns must follow these additional criteria:
- Use a conversion-focused bidding strategy optimized for the "Submit lead form (Google hosted)" conversion goal.
- For Search campaigns, only Responsive Search Ads (RSAs) are compatible - Expanded Text Ads cannot be used.
- Maintain a history of policy compliance, as certain industries face restrictions.
| Requirement Category | Specific Criteria |
|---|---|
| Campaign Types | Search, Display, Performance Max, Video (Beta/Android-only) |
| Account Spend | $50,000+ lifetime spend (or $1,000+ with Advertiser Verification) |
| Bidding Strategy | Conversion-focused (e.g., Maximize Conversions, Target CPA) |
| Ad Format | Responsive Search/Display Ads |
| Restricted Verticals | Sexual content, Alcohol, Gambling, Healthcare, Politics |
Privacy Policy URL and Eligibility
You must provide a valid privacy policy URL. This URL will appear at the end of your lead form, giving users transparency about how their data will be handled. Google Ads Help emphasizes that "using personal information in ways that users have not consented to is strictly not allowed". Your privacy policy should comply with local legal standards and clearly outline your data handling practices.
Eligibility is also limited to first-party advertisers or PPC agencies with a direct connection to the product or service. Lead aggregators and affiliate networks are typically excluded. Additionally, businesses in sensitive industries - such as alcohol, gambling, healthcare, or political content - cannot use lead form assets. Geographic restrictions also apply, so if your target audience is in a restricted region, the form won’t be visible.
Meeting these prerequisites ensures you’re ready to configure your lead form assets effectively.
How to Set Up Lead Form Extensions
Once you've met the prerequisites, it's time to create your lead form asset. This setup ensures a smooth process for capturing leads directly through your ads, whether you're working with new or existing campaigns. You can also use automation platforms like Adalysis to manage these assets at scale.
Accessing the Lead Form Extension Setup
For new campaigns, head to the Campaigns menu, click the plus icon, and select New campaign. Choose Leads as your goal and pick a compatible campaign type, such as Search, Video, Performance Max, or Display. During the campaign setup, you'll find the lead form editor in the Assets or Lead form section.
For existing campaigns, navigate to Assets in the Campaigns menu. Under the Associations tab, select Lead form from the asset type list. You can either check an existing lead form to add it to your campaign or click the plus icon to create a new one. To set it up at the account level, go to Assets, click the plus icon, select Lead form, and use the Add to dropdown to choose Account.
The setup process varies slightly depending on the campaign type. For Search and Display campaigns, scroll to the Assets section, select More asset types, and then choose Lead forms. For Video campaigns, go directly to the Lead form section and select Form.
Once you've selected or created your lead form asset, you can move on to configuring its basic settings.
Configuring Basic Form Settings
Start by entering a 30-character headline. Then, add your business name and a description (up to 200 characters) that explains what users will receive when they submit the form. For Search campaigns, you'll also need to upload a background image with dimensions of 1200 x 628 pixels and a 1.91:1 aspect ratio.
Make sure to include your Privacy Policy URL, as this is required for form approval - it will appear at the end of the form. Next, choose your optimization setting:
- "More qualified" targets users more likely to convert based on your conversion goals.
- "More volume" focuses on maximizing the number of leads generated.
With these basics in place, you can move on to customizing your form fields and calls-to-action (CTAs).
Customizing Form Fields and Call-to-Actions
Choose the standard fields you want to collect. Options include Name (Full or First/Last), Email, Phone number, City, Zip/Postcode, State/Province, Country, Company name, Job title, Work email, Work phone number, National ID, and Age verification. At least one field is required, and either an email or phone number must be mandatory to enable enhanced conversions.
You can also add qualifying questions by clicking "+Question." Use pre-existing questions or suggest your own. These questions are required, but you can implement lead scoring by tagging specific answers that "qualify" a lead in your data output.
Finally, set up two CTAs:
- The Ad CTA encourages users to open the form. Select a type from the dropdown and add a description.
- The Submission CTA appears on the thank-you screen. Include a headline, description, and a button that links to your landing page.
Keep in mind, if you're editing an existing lead form, you won't be able to change specific questions. To modify data fields, you'll need to create a new lead form asset.
Lead Delivery and Performance Tracking
Once you've set up your lead form settings and CTAs, automating lead delivery becomes critical for tracking conversions efficiently, often requiring advanced PPC automation tools to manage data flow. Keep in mind, Google Ads retains leads for only 60 days, so automation ensures you don't miss out on potential prospects.
Setting Up Webhook Integration
Webhooks allow Google Ads to send lead data directly to your CRM through an HTTP POST request. To enable this feature, head to the "Export leads from Google Ads" section in your lead form editor and choose "Other data integration options".
You'll need to provide a Webhook URL and Key for authentication and routing. Platforms like LeadsBridge, HubSpot, and Salesforce simplify this process by generating and applying the necessary webhook credentials for you.
The payload sent by the webhook includes key identifiers such as lead_id, form_id, campaign_id, and gcl_id (Google Click ID). It also contains user data within the user_column_data field. Use the lead_id to avoid processing duplicate leads, as Google does not guarantee leads will only be delivered once. Additionally, configure your JSON parser to ignore any unrecognized fields since Google may introduce new optional fields in the future. Strict parsers could disrupt your integration if they encounter unexpected data.
Testing your setup is an essential step to ensure everything is working as intended.
Testing Lead Delivery and Conversion Tracking
To test your webhook, click "Send test data", which will send a sample payload to your CRM for verification. If your CRM returns an HTTP 200 status code, you'll see a green status confirming successful receipt. However, it's equally important to verify within your CRM that all fields, such as Name, Email, and Phone, are correctly populated.
"Without performing this step [verifying the CRM received the payload] there is no guarantee that the webhook is working properly." - Google Developers
Make sure your endpoint is configured to return 200 for successful requests and 5xx for temporary errors, which prompts Google to retry delivery. To enhance security, consider using HMAC signatures or IP allowlists to ensure only authorized requests are processed. The gcl_id included in each payload is vital for connecting leads to specific ad clicks, enabling precise conversion tracking.
| HTTP Response Code | Meaning | Retry Behavior |
|---|---|---|
| 200 | Success; lead received correctly | N/A |
| 4XX | Client error; bad request or authentication | No retry |
| 5XX | Server error; intermittent issue | Yes, Google will retry |
Best Practices for Lead Form Extensions
After setting up your lead form settings, these tips can help you get the most out of your campaigns.
Optimizing Form Length and Field Selection
Keep it short and simple. Studies show that 80% of users abandon forms that are too long or take too long to load. Every additional field you add increases the risk of losing potential leads. Stick to the basics - name and email are usually enough to get started.
Decide on your goal. If you're aiming for a higher number of leads, choose "More volume." But if you're after high-quality leads, go with "More qualified." This choice should guide the length of your form to align with your campaign's purpose.
For ease of use, especially on mobile, use dropdown menus or multiple-choice fields instead of open text boxes. Google can even pre-fill standard fields like Name and Email from the user's account, making submissions as easy as one tap. And remember, mark non-essential fields as optional to reduce friction.
Writing Effective Headlines and CTAs
Your headline is limited to 30 characters, and descriptions can only be 200 characters in Google Ads. Make every word count. Use headlines that immediately highlight value, such as "Get your free quote now" instead of something generic like "Learn more". Speak directly to your audience with action-oriented language, using words like "you" to make the message feel personal.
Match your call-to-action (CTA) with the level of commitment you're asking for. Google offers options like "Download", "Get quote", "Book now", "Subscribe", and "Sign up". For example, use "Download" for a free resource like a whitepaper, or "Book now" for appointment-based services. Use the description to explain your offer in more detail, and customize the post-submit message with a follow-up CTA like "Visit website" to keep users engaged.
Once your form is live, track its performance and test variations to find what works best.
Monitoring Performance and A/B Testing
Keep an eye on key metrics like form completion rate, cost per lead (CPL), and conversion rate to measure success. If completion rates are low, try reducing the number of fields. If your CPL is too high, adjust your bidding or targeting strategies. Google automatically creates a "Lead form conversion action" for basic tracking, but using Enhanced Conversions for Leads can boost conversions by about 10% by matching hashed user data with offline sales.
Experiment with 2–3 CTA options (e.g., "Get a Quote" vs. "Sign Up") and test shorter forms against versions with one or two qualifying questions. This can help you find the right balance between lead volume and quality. Timely follow-up is also crucial - reaching out to leads within five minutes makes you 21 times more likely to turn them into opportunities compared to waiting an hour. Fran Sánchez, Head of Marketing at Ads Workbench, emphasizes:
"Responding within five minutes makes teams 21× more likely to turn a lead into an opportunity compared to waiting an hour"
For more tips on campaign optimization, check out the Top PPC Marketing Directory. It offers resources for A/B testing tools, performance tracking, and expert agencies focused on lead generation. Also, automate your data sync with webhooks instead of relying on manual CSV downloads - Google only stores lead data for 30 days, so quick action is key to capturing potential leads.
Conclusion
This guide has walked you through the essential steps to set up Google Ads Lead Form Extensions. These forms make it easier to capture leads directly within your ads by leveraging pre-filled user data from Google accounts and enabling one-tap submissions. This streamlined process helps reduce the drop-off that often occurs with traditional landing pages.
Double-check your settings to ensure your form aligns with your conversion goals. If you’re using a CRM, integrate it through a webhook for real-time lead delivery. Keep in mind that Google only stores lead data for 30 days, so timely integration is key.
To get the best results, focus on finding the right balance between form length and lead quality. Limit required fields to avoid overwhelming users, and keep an eye on metrics like form completion rates and cost per lead to fine-tune your approach.
Webhook integration for instant lead delivery can significantly improve follow-up times and boost conversion rates. Use segmented reports to track performance, providing insights into how many users open and submit your forms.
For more tools and resources to enhance your lead generation and PPC campaigns, check out the Top PPC Marketing Directory. It’s a great place to find solutions for optimizing every stage of your advertising efforts.
FAQs
Why can’t I see lead form assets in my Google Ads account?
If lead form assets are missing from your Google Ads account, it’s likely because they haven’t been created or configured yet. These assets don’t show up automatically; they need to be set up correctly within your campaign. Make sure you follow the setup instructions carefully and activate them - only then will they appear in your account.
Should I choose “More volume” or “More qualified” for my lead form?
If you're aiming to attract leads that are highly likely to convert, even if it means receiving fewer submissions, go with “More qualified”. On the other hand, if your priority is to gather as many leads as possible, regardless of their potential to convert, choose “More volume”. The choice ultimately depends on your campaign's goals - whether you value quality or quantity.
How can I send leads to my CRM instantly instead of downloading a CSV?
To connect leads from Google Ads lead form extensions directly to your CRM, use webhook integrations. This setup enables leads to flow into your system instantly, eliminating the need to manually download and upload CSV files. You can configure webhooks directly in your lead form settings or rely on third-party tools like LeadsBridge to simplify the process. For detailed instructions, Google offers official guidance to help you integrate webhooks smoothly with your CRM.