Radius targeting in Google Ads allows businesses to focus ads on customers within a specific distance from a location, like a store or office. This method is ideal for local businesses aiming to maximize ad relevance and improve ROI by targeting nearby customers. Here's the quick breakdown:
- What it is: A feature to display ads to users within a defined radius around a location.
- Why use it: Perfect for businesses with service areas that don’t align with city or ZIP code boundaries (e.g., restaurants, gyms, plumbers).
- Setup steps:
- Go to Campaigns > Locations.
- Enable the Radius option.
- Enter a center point (address, ZIP code, or coordinates).
- Define the radius distance (minimum of 1 km or 0.6 miles).
- Save and verify settings.
- Tips:
- Start with a small radius (e.g., 5 miles) and adjust based on performance.
- Use location exclusions to refine targeting.
- Analyze performance by distance and adjust bids for high-performing zones.
Radius targeting ensures your ads reach the right audience while minimizing wasted spend. For best results, regularly review campaign data and refine your strategy.
Google Ads Location Radius Targeting In 2025
How to Set Up Radius Targeting in Google Ads
How to Set Up Radius Targeting in Google Ads: Step-by-Step
Follow these steps to configure radius targeting in Google Ads effectively.
How to Access Location Settings
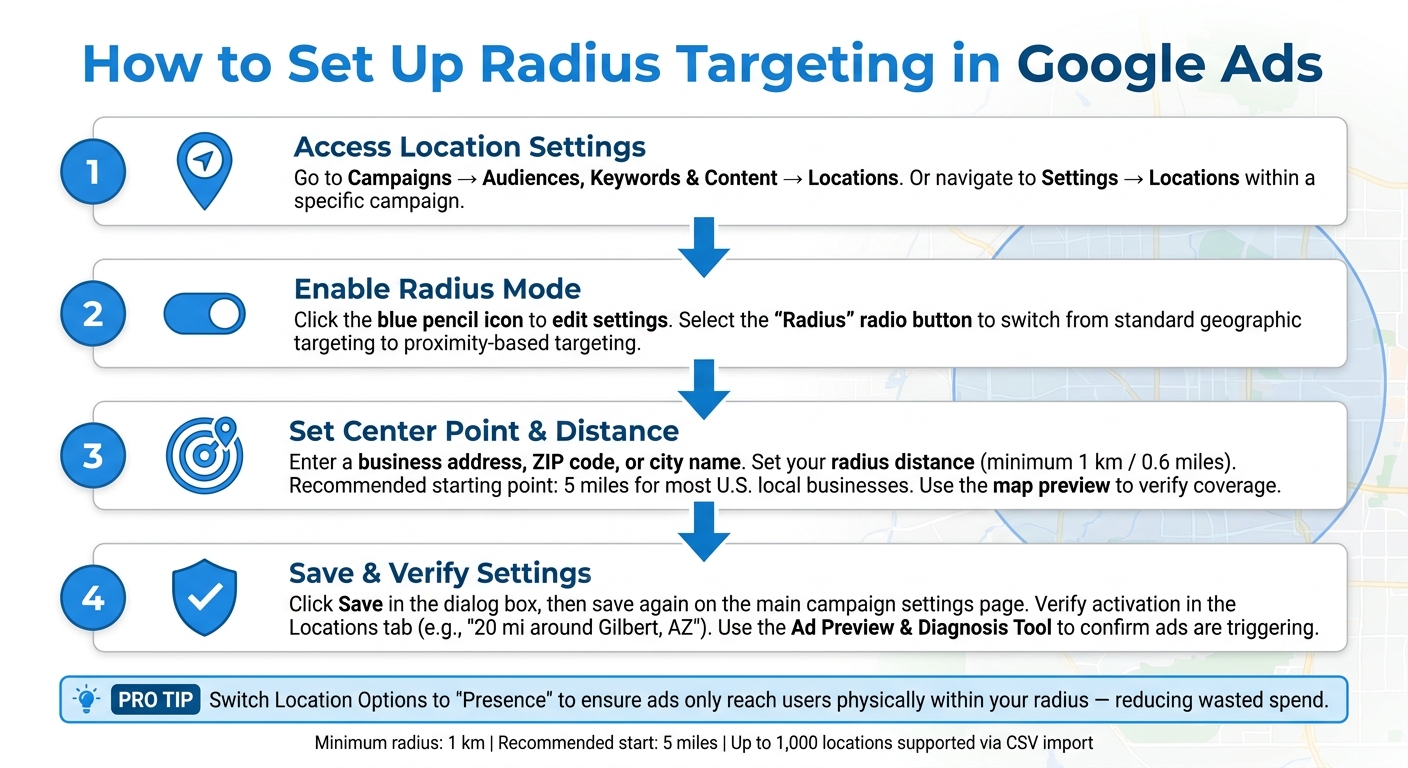
To start, navigate to Campaigns > Audiences, keywords, and content > Locations in Google Ads. Alternatively, if you're working within a specific campaign, go to Settings > Locations.
Once in the Locations menu, click the blue pencil icon to edit your settings. Then, select the Radius radio button to shift from standard geographic targeting to proximity-based targeting. This sets the stage for defining your target area.
How to Set the Radius Center Point
After enabling the Radius option, a search box will appear for entering your center point. You can input a full business address (e.g., 123 Main St, Austin, TX 78701), a ZIP code, or even a city name. For most local businesses, using a precise street address ensures the most accurate targeting.
If you need a visual confirmation of your target area, click Advanced search. This opens a map-based interface, allowing you to see exactly where your radius will be drawn. This feature is particularly useful if your business is near city or county boundaries.
How to Set the Radius Distance
In the distance field, enter a numerical value and choose miles from the dropdown menu (U.S.-based accounts default to miles). The radius must be at least 1 kilometer.
For many local businesses in the U.S., starting with a 5-mile radius works well. However, adjust this based on your specific market. For example, a downtown Chicago coffee shop might target just 1–2 miles, while a suburban Phoenix landscaping company could extend to 15–20 miles. Use the map preview to double-check your selected area. Utilizing top PPC tools can further refine your geographic targeting strategy.
"If you target a small radius or very small location, your ads might only show intermittently or not at all. That's because small targets might not meet our targeting criteria." - Google Ads Help
Once you've outlined your target area, you're ready to save and verify your settings.
How to Save and Verify Your Settings
After defining your center point and radius, confirm the configuration by clicking Save in the dialog box. Then, finalize the process by saving on the main campaign settings page as part of your PPC campaign optimization - many users forget this second step, which can leave their settings unapplied.
To double-check that everything is active, navigate to the Locations tab within your campaign. Your radius will appear as a line item, such as "20 mi around Gilbert, AZ." To ensure your ads are triggering for users within the radius, use the Ad Preview and Diagnosis Tool under Tools & Settings → Planning. This tool is especially handy if you're outside the target area and can't see the ads yourself.
Tips for Improving Radius Targeting Performance
Setting up radius targeting is just the beginning. These tips will help you fine-tune your approach, improve results, and make the most of your ad budget.
How to Target Multiple Locations with Different Radii
Managing ads for multiple store locations or service areas doesn’t mean you need separate campaigns for each one. Instead, use the Locations tab in your campaign settings to set up radius targeting for each address. You can streamline the process by using the "Add locations in bulk" feature or importing a CSV file, allowing you to target up to 1,000 locations at once.
For better insights, try a tiered radius strategy. Add the same center point with varying distances, such as 2, 5, and 10 miles. This lets you evaluate performance based on proximity and apply tailored bid adjustments to each distance tier.
How to Combine Radius Targeting with Location Exclusions
Radius targeting creates a circular boundary, but real-world service areas are rarely that simple. This is where location exclusions come into play. By excluding specific areas within your radius, you can ensure your ads are shown only where they’re most relevant. In your campaign's Exclusions tab, you can block specific ZIP codes, neighborhoods, or cities that fall within your radius but don’t align with your service area.
Here’s an example: If two store locations are 15 miles apart and each uses a 10-mile radius, their coverage areas may overlap. Faisal Iqbal, Director of Onboarding at ClicksGeek, recommends:
"Set up location exclusions to prevent this [overlapping territories]. Draw a line between locations and exclude the opposing side from each campaign... This forces Google to show only one location's ads in any given area."
Keep in mind that exclusions override inclusions in Google Ads. If a ZIP code is both inside your radius and on your exclusion list, your ads won’t appear there. To ensure exclusions work correctly, switch your location setting to "Presence" instead of "Presence or interest."
Once your targeting is set up, you can refine further by adjusting bids based on how each radius performs.
How to Adjust Bids Based on Radius Performance
After gathering enough data - ideally at least 30 conversions per zone - you can optimize bids to focus on the best-performing areas. Increase bids for zones with higher conversion rates to allocate more budget where it matters most.
Google allows bid adjustments ranging from –90% to +900%. To determine adjustments, compare each zone's CPA or ROAS to your campaign average. For instance, if a zone performs 20% better than average, a +20% bid adjustment is a logical next step.
| Scenario | Suggested Bid Adjustment | Rationale |
|---|---|---|
| Urban core / high competition | +20% to +50% | Higher density justifies more aggressive bids. |
| Strong suburban performers | +10% to +30% | Proven results warrant increased investment. |
| Rural / sparse traffic areas | –20% to –50% | Lower competition allows for reduced bids. |
| Near competitor locations | +30% to +70% | Targets high-intent users in competitive zones. |
Important: Bid adjustments only apply if you’re using Manual CPC or Maximize Clicks bidding strategies. If you’re using Smart Bidding options like Target CPA, Target ROAS, or Maximize Conversions, Google’s algorithm automatically handles geographic bid variations and will ignore manual modifiers.
sbb-itb-89b8f36
Common Radius Targeting Mistakes and How to Fix Them
Campaigns can fall short when radius targeting settings are not optimized. Let’s dive into the most common mistakes and how to address them effectively.
Setting the Radius Too Wide
Choosing a radius that's too large can drain your budget fast. For instance, some advertisers set a 50-mile radius, even though their actual customers are mostly within 10 miles. This results in paying for clicks from users who are unlikely to visit the business. Deepanshu Udhwani, Founder of itsdeep, explains:
"The biggest budget waste for local businesses is overly broad location targeting."
A better approach? Start small - try a 5-mile radius - and review your conversion data after two to four weeks. Adjust based on performance, and always double-check the map preview to ensure your targeted area aligns with your actual service region.
Using the Wrong Location Options Settings
By default, Google Ads uses the "Presence or Interest" setting. This means your ads can appear to people who merely search about your area, even if they’re hundreds of miles away. For local businesses like gyms or dental practices, this setting can lead to wasted ad spend.
The fix: switch to "Presence" in your campaign's Location Options. This ensures your ads only reach people physically located in or regularly present within your radius. Alex Bradbury, Senior PPC Account Manager at Embryo, points out:
"Google recommend targeting people in, regularly in or who've shown interest in your included locations, but we find that targeting people only in or regularly in your included locations provides better results, with reduced wasted spend."
However, there are exceptions. If you’re in industries like travel, real estate, or education, the "Presence or Interest" setting might work better. Advertisers in these fields reported a 5% boost in conversions on Search campaigns when using this option.
Not Reviewing Performance by Distance
Neglecting to analyze performance by distance can also lead to wasted budget. Without this insight, you might be paying for reach that doesn’t result in conversions. The Coinis Editorial Team highlights:
"If most conversions come from within 3 km and your radius is set to 15 km, you're paying for reach that doesn't convert."
To address this, use Google Ads' distance reports to evaluate conversion rates, cost per acquisition, and ROAS based on proximity tiers - such as 0–3 miles, 3–7 miles, and 7–15 miles. If you notice a sharp decline in conversions beyond a certain distance, adjust your radius accordingly. This data also guides your bid adjustment strategy: focus your budget on high-performing proximity rings with positive bid modifiers, while scaling back on less effective areas.
Tools and Resources for Radius Targeting
Once you've set up and refined your radius targeting, the right tools can help maintain performance and streamline management. These resources not only simplify the process but also ensure your campaigns remain effective and scalable.
Top PPC Marketing Directory
Looking for the perfect agency or tool for local PPC campaigns can feel overwhelming. The Top PPC Marketing Directory makes it easier by offering a curated list of vetted PPC agencies and tools. Whether you need help with pinpointing center points or managing bid adjustments by proximity, this directory is a one-stop resource for comparing specialists who understand radius targeting.
The directory supports various campaign needs, including:
- Bid management
- Performance tracking
- Ad copy optimization
- Campaign management
For businesses focusing on location-based advertising, this means access to resources specifically designed to meet local marketing goals.
Features That Support Local Campaigns
In addition to expert directories, ad management tools like Optmyzr can further refine your campaign strategies. For instance, Google Ads Editor is a free, offline tool that simplifies bulk updates for location targeting. You can import proximity targets via CSV files, managing up to 1,000 locations in a single upload.
The Ad Preview and Diagnosis Tool ensures your ads are being delivered within your targeted area. Meanwhile, the Location Manager in the Shared Library allows you to create location groups using data from your Google Business Profile, which is especially useful for businesses with multiple locations.
For ongoing management, distance reports in Google Ads provide insights into where conversions are happening relative to your business. As the Coinis Editorial Team highlights:
"If users closest to your business convert at a higher rate, apply a positive bid adjustment for that inner zone... This allocates budget toward your best-performing distance tier."
Google Ads offers bid adjustment flexibility, ranging from –90% to +900%, allowing you to focus your budget on the distance tiers that yield the best results.
These tools and strategies make radius targeting not only manageable but also highly effective for location-based campaigns.
Conclusion
Radius targeting offers businesses a straightforward way to focus on specific service areas. Setting it up is simple: go to your location settings, switch to Radius mode, choose a center point, and define your distance. A 5-mile radius is a solid starting point for most U.S. local campaigns, with adjustments made based on actual performance data.
To improve results, use "Presence" settings to target users physically in your area, refine exclusions to avoid wasted spend, and apply bid adjustments to focus on high-performing zones.
Keep in mind that location targeting depends on signals like IP addresses, GPS data, and browser behavior, which aren't always perfectly accurate. Regularly reviewing your distance reports is key to identifying underperforming areas before they impact your budget.
For expert help, check out the Top PPC Marketing Directory, where you'll find trusted PPC agencies and tools tailored for local campaigns, bid strategies, and performance tracking.
FAQs
What’s the best radius to start with?
For many local campaigns, starting with a 5-mile radius often works well. Google Ads sets a minimum radius of 1 kilometer to maintain user privacy and ensure a large enough audience. Begin with a cautious approach, track conversion volume and cost per conversion over 2–4 weeks, and make adjustments based on performance. Be sure your chosen radius matches your service area and reflects how far customers are typically willing to travel.
Why aren’t my ads showing in my radius?
If your ads aren’t showing up in your intended area, double-check your location settings. By default, Google applies Presence or Interest targeting. This means your ads might appear to people outside your target area if they’ve expressed interest in it. To keep your ads strictly local, switch to Presence only, ensuring they’re shown only to users physically within your chosen radius.
Make sure your radius is no smaller than 1 kilometer. Also, instead of searching for your ads manually, use the Ad Preview and Diagnosis Tool for accurate insights.
Should I use “Presence” or “Presence or interest”?
Choose “Presence” if your customers need to be physically located in your target area. This works well for businesses offering local services, like plumbing or dining. On the other hand, select “Presence or interest” if your business serves people planning to visit or move to your location, such as hotels or real estate. This approach helps target the right audience while avoiding wasted ad spend.