Multi-location PPC works when each store has its own targeting, budget logic, and reporting. If you treat 10 locations like 1, you blur performance, waste spend, and let nearby stores compete against each other.
Here’s the short version:
- I set campaign structure using top PPC tools based on control needs - one campaign per store for clean budgets and reporting, or regional groupings when volume is too low.
- I use presence-only targeting and hard exclusions so nearby locations do not bid into the same area.
- I build keywords and ads around service + city/ZIP + intent, then send clicks to the matching location page.
- I split spend by market demand, CPA/CPL, and business priority - not by store count.
- I track calls, forms, bookings, and store visits at the store level, then review performance weekly and monthly.
A simple rule: if I cannot see which store drove the lead, I cannot budget the account the right way.
For most brands, that means focusing on 5 things:
- Structure
- Geo-targeting
- Local keywords and ads
- Budget split
- Store-level tracking
Google Ads can default to showing ads to people with interest in an area, not just people in it. That one setting alone can send local budgets outside the market if I do not change it.
Below, I’ll walk through the setup in plain terms so you can keep spend tied to the right location, cut overlap, and read performance by store instead of guessing.
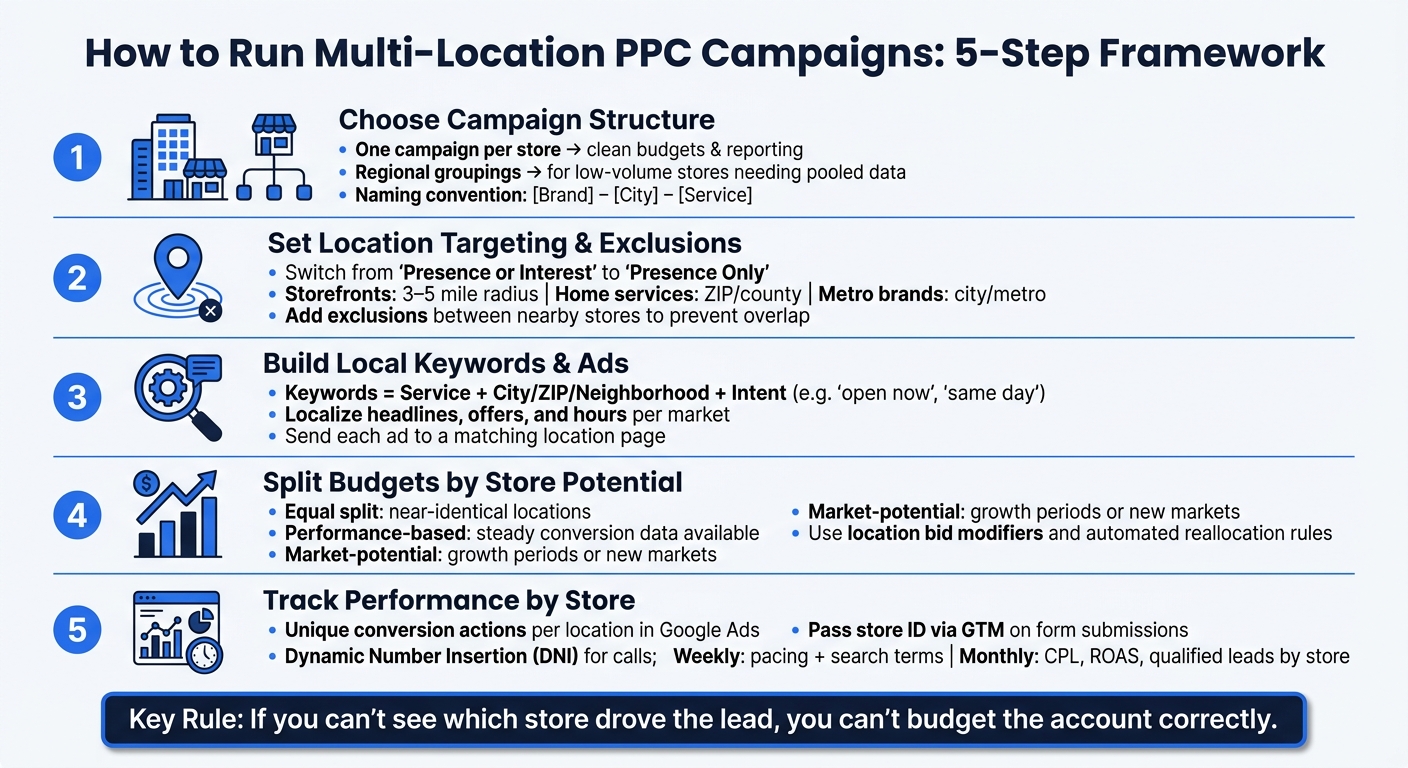
Multi-Location PPC Campaign Setup: 5-Step Framework
PPC Playbook for Multi Location & Franchises (For 2026)
sbb-itb-89b8f36
1. Choose the Right Campaign Structure
Campaign structure shapes how you handle budget, bidding, and reporting.
Use one campaign per store when budgets and reporting must stay separate
Use one campaign per location when each store needs its own budget, bid strategy, or reporting. This setup gives you independent bidding and clean reporting at the store level. It can also cut down on overlap between nearby locations, which helps avoid stores bidding against each other and driving up costs.
Group lower-volume stores into regional campaigns
Group low-volume stores into regional campaigns when one location on its own can't generate enough conversions for automated bidding to work well. A regional setup pools data faster, which gives automated bidding more to learn from and act on. The downside is less control over budget by store, but that's often a better trade-off than running too many campaigns with thin data.
Set naming conventions and location groups
Use a steady naming format like [Brand] - [City] - [Service] across campaigns, ad groups, and UTMs. Use location groups to cluster Google Business Profiles, and use a Manager Account (MCC) for large portfolios that need separate billing and permissions.
Once the structure is in place, define each location's target area and exclusions.
2. Set Location Targeting and Exclusions
Target cities, ZIP codes, counties, or a radius based on your service area
Once your campaign structure is set, decide where each campaign should run. The goal is simple: line up targeting with how people in that market shop and book.
A few common setups work well:
- Storefronts: use a 3-5 mile radius
- Urgent care and other high-urgency services: use a tighter drive-time area
- Home services: target by ZIP code or county
- Brands with metro-wide demand: target the city or metro area
This keeps coverage tied to demand instead of casting too wide a net.
Use presence-based targeting and add exclusions between nearby stores
Google Ads and Microsoft Advertising both default to "Presence or interest." That setting can show ads to people outside your service area, which is usually not what a local business wants. Switch to presence-only targeting. Then add exclusions between nearby locations by ZIP code, city, or county so one store doesn't bid against another.
"The default location targeting setting is 'Presence or interest,' which can display your ads to users outside your physical service area. For most local businesses, you want to change this to 'Presence: People in or regularly in your targeted locations.'" - Dustin Cucciarre, COO, ClicksGeek
In dense markets, tighten boundaries even more. A smaller radius - or polygon targeting where available - can better match each store's catchment area.
With clean geographic boundaries in place, it's much easier to localize keywords and ads for each market.
3. Build Local Keywords and Market-Specific Ads
Once you’ve set each location’s boundaries, line up your search terms and ad copy with the way people in that market actually search.
Build keyword lists with city, neighborhood, ZIP code, and near me terms
Build keywords around three things: service, location, and intent. Use state, metro, city, neighborhood, ZIP code, and landmark terms when search demand supports them.
Add intent and urgency modifiers like "open now", "same day", "emergency", "affordable," and "best". Use phrase match and exact match versions to pick up high-intent searches. For example, a dentist in Austin might target "dentist in Austin", "dentist 78704," and "dentist near me." Keep a running negative keyword list for nearby markets and off-target terms like DIY, jobs, and free.
Use the same city, ZIP, and store naming across keywords, ads, URLs, and UTMs. That keeps each store’s traffic and reporting separate instead of mixing everything together. Using advanced PPC optimization platforms can further streamline this reporting across dozens of locations.
Write ad copy by market without breaking brand standards
Keep the main brand message the same. Then localize only what needs to change: the headline, offer, hours, and neighborhood mention. Adding the city name to ad copy can improve click-through rate. Use dynamic location insertion when the platform supports it. In fields like healthcare, details such as "major insurance plans accepted" can remove a big conversion barrier before the click.
Send each ad to a location page built for that market, with the local phone number, address, hours, and trust signals. When you connect campaigns to the matching Google Business Profile, you can use location assets that show the address, map pin, and distance to the searcher right in the ad. Use brand-approved templates so top PPC agencies and local teams can launch faster without splitting reporting.
Send each ad to the matching location page so store-level tracking stays clean.
4. Split Budgets and Bids by Store Potential
Once you've grouped each market, put more spend behind the locations most likely to drive profitable conversions. Don't split budget by store count. Split it by market potential. That means giving more budget to locations with stronger demand, lower CPA/CPL, and higher business priority.
Choose a budget model for each location tier
Before you lock in a model, pull each location's conversion rate, CPA, and revenue from Google Ads location reports. In most multi-location setups, three models do the job:
- Equal split: best for a small set of near-identical locations.
- Performance-based: best when past conversion data is steady.
- Market-potential: best during growth periods or in new markets.
If two locations look about the same on performance, use business priority as the tiebreaker.
Use separate bidding for top markets and shared budgets for smaller ones
Top markets usually need their own budgets and bidding. Smaller locations can stay in shared regional budgets if they don't produce enough conversion volume on their own.
"Shared regional budgets often overfund larger markets and underfund smaller ones." - Mariia Grachova, CEO, Loona Agency
You can also use location bid modifiers to push bids up or down based on market performance. Then add automated rules to move budget away from locations that keep missing CPL or CPA targets, and toward the ones that are hitting them. Check budgets every week and reallocate spend as results shift using smart recommendations.
That setup only works if you can measure performance by store or region.
5. Track Performance by Store or Region
Once you split budgets by location, you need to track results the same way. If you lump everything together later, you lose the whole point. Location-level tracking is what lets you defend budget moves with clean data.
Set up store-level call tracking, form routing, and mapping each conversion to a store
Start with unique conversion actions for each location in Google Ads, not one shared account-wide conversion. That gives you a cleaner view of which store is driving calls, forms, and bookings.
For phone calls, use Dynamic Number Insertion (DNI) on each location page so calls tie back to the right store. Set call duration thresholds at 60–90 seconds to screen out wrong numbers and short calls that don't show much buying intent before they distort reporting.
For forms, pass a store ID or city name through Google Tag Manager when the form is submitted. Also, use consistent UTM parameters on every Google Business Profile link. That way, Google Business Profile traffic lands in your analytics platform under the right store instead of showing up as a generic site visit. Each location should have its own landing page, tracked phone number, and contact form.
| Conversion Type | Tracking Method | Attribution Level |
|---|---|---|
| Phone Calls | Dynamic Number Insertion (DNI) | Store/Campaign Level |
| Form Fills | GTM Data Layer / Unique URLs | Store/City Level |
| Store Visits | Google Store Visit Conversions | Store Level (Estimated) |
| Bookings | GCLID Import / CRM Sync | Store or provider level |
Review performance weekly and monthly by location
Use that same store-level data to shift spend from weaker markets to stronger ones.
Weekly reviews should stay focused on a few basics: budget pacing, search term reports, and whether conversion tags are firing for each store. Monthly reviews should go deeper - CPL by store, qualified leads or booked appointments, and ROAS by market.
If one location starts to lag, don't cut budget right away. Run a short check first:
- See if CPCs have climbed
- Add negative keywords for low-intent or out-of-area searches
- Confirm call tracking numbers still work
- Make sure form routing is still sending leads to the right store
If tracking is clean and the store still misses CPL targets, move spend to markets that are performing better.
Conclusion: Build for Control, Local Relevance, and Clean Reporting
Multi-location PPC works best when tracking, reporting, and budget changes all stay tied to the right store.
FAQs
When should I use one campaign per store?
Use one campaign per store when you have 5-20 locations, a central team running paid search, and a need for direct control over budgets, bidding, and store-level settings.
This setup can also cut down on overlap when locations target the same broad keywords. Instead of stores competing against each other in the auction, each campaign has a clearer lane. It also makes it easier to tailor ad copy to each market and track true ROI by store.
How do I stop nearby locations from competing?
Set clear geographic boundaries so one location doesn’t compete with another. The cleanest setup is to use separate campaigns for each location - or for a small, tight cluster - and match radius or polygon targeting to each store’s catchment area with no overlap.
You should also add territory exclusions and negative keywords for nearby locations. In Google Ads, use Presence targeting so ads show only to users who are actually in those areas.
What should I track for each store?
Track performance at the individual store level so you can measure ROI with a clear view of what each location is doing. That makes budget decisions a lot smarter. Instead of chasing vanity metrics like clicks, tie spend to actual business results.
Focus on metrics that show whether a store is producing revenue:
- Cost per acquisition
- Cost per booked appointment
- ROAS
- Conversion volume by store
- Call tracking with local identifiers and 60- to 90-second call filters
- Offline conversions such as store visits
- Standardized UTM parameters
This setup helps you see which stores are pulling their weight, which ones need work, and where extra budget is most likely to pay off.